Categories
Recipes

Vegetable Manchurian Recipe (Gravy / Dry)

Manchurian is one of the most famous chinese food. Many of the people think that it is very difficult to make a Manchurian at Home, but no it’s not. I have experienced it personally, that making a Manchurian at home is really easy.

Vegetable Manchurian Recipe Delicious
Delicious Vegetable Manchurian Recipe

Vegetable Manchurian Balls (Dry Veg. Manchurian)
Dry Vegetable Manchurian

This recipe makes 4 servings. It takes about 15-20 minutes for the preparation while cooking takes 10-15 minutes.

Ingredients (For the Vegetable Balls) :

Vegetable Manchurian Balls

  • 3 Cup Cabbage (Grated)
  • 1/4 cup Carrot (Grated)
  • 1/2 cup chopped Onions
  • 1 Medium Green Capcicum (Finely Chopped)
  • 5-7 French beans (Finely Chopped)
  • 1.5 Tablespoon Ginger (Finely Chopped)
  • 2 Tablespoon Cornflour
  • 1/2 Cup refined flour (maida)
  • 3 to 4 cloves of garlic (lehsun) (Finely Chopped)
  • 2 Green chillies (Finely Chopped)
  • Salt (as per taste)
  • Oil for deep-frying

Ingredients (For the Gravy / Sauce) :

Vegetable Manchurian Gravy Sauce

  • 1 Medium Onion
  • 2 Tablespoon Oil
  • 2 inch stalk of Celery (Finely Chopped)
  • 2 Tablespoons Ginger (Finely Chopped)
  • 4-6 cloves of garlic (lehsun) (Finely Chopped)
  • 3 Green chillies (Finely Chopped)
  • 2 Tablespoons Soya sauce (Light soy sauce)
  • 2 Cup Vegetable Stock
  • 3 Medium Spring onions (Finely Chopped)
  • Salt (as per taste)
  • 3 Tablespoon Cornflour mixed in 1/2 cup of water
  • 1 Tablespoon White Vinegar

Method :

For making Vegetable Balls :

    1. Take a Bowl and Put Cabbage, Carrots, Onions, Garlic, Green Chillies, Refined Flour, Cornflour, salt and pepper in it. Mix well.
    2. Now make small balls out of that mixture. You can sprinkle few drops of water if you find it difficult to mkae balls from the mixture.
    3. Now deep fry it in hot oil, until the color gets Golden Brown. Then put them on an absorbent paper and keep it aside after few minutes.

For making the Gravy / Sauce :

      1. Heat the oil in a frying pan (on a high flame)
      2. Now add Ginger, Garlic, and Green Chillies and stir fry on the high flame (for about 1 minute)
      3. Mix Stock vegetables, Cornflour Paste, Soya Sauce, Salt and Sugar. Then simmer for a few minutes

Serving :
Put the Vegetable Balls in Hot Gravy/Sauce, and serve it.

Note : You can add some water to the gravy, If you feel that the Gravy/Sauce is very thick.

Vegetable Manchurian Indredients Index

Categories
Computers Main Operating Systems Windows

New Windows 8 Keyboard Shortcuts / Keys : Official List from Microsoft (Updated)

As you already know, Windows is a most used Operating System, due to its GUI and user-friendliness. Recently Microsoft has released the Consumer Preview Version of Windows 8.

Microsoft always tries to make Windows faster and easier to use. For the same reason now they have introduced the Official Shortcut Keys for the Windows 8 Edition.

Windows 8 Developer Preview Edition Start Screen

Here is the List of Shortcuts of Windows 8 Edition.

Shortcuts starting with Windows Key :

Windows Key Keyboard Shortcuts on Windows 8 Edition
  1. Windows Key : Open the Start Screen
  2. Win + Z : Open Application bar
  3. Win + W : Search in Settings of the system
  4. Win + X : Open Windows Mobility Center
  5. Win + V : Switch among notifications
  6. Win + Shift + V : Switch among notifications (in reverse manner)
  7. Win + U : Open Ease of Access Center
  8. Win + T : Set focus to Taskbar and toggle through Programs
  9. Win + S : Open OneNote Screenshot Creator (If Microsoft Office-OneNote is installed)
  10. Win + R : Open Run dialog box
  11. Win + Q : Open Windows Apps Search
  12. Win + P : Display Projection Options
  13. Win + O : Disable screen rotation / orientation
  14. Win + N : Create new OneNote (If Microsoft Office-OneNote is installed)
  15. Win + M : Minimize all windows
  16. Win + Shift + M : Restore minimized windows
  17. Win + L : Lock your computer
  18. Win + K : Open Device Connections
  19. Win + J : Toggle foreground between the filled and snapped applications
  20. Win + I : Open Settings Panel (To change Settings for the Wireless Networks, Volume, Apps, Brightness or to Shut Down)
  21. Win + H : Open Share Panel
  22. Win + G : Toggle through Windows Desktop Gadgets
  23. Win + F : Search for the Files in Computer
  24. Win + Ctrl + F : Search for Computers in a network
  25. Win + E : Show Windows Explorer with File’s Tree View
  26. Win + D : Toggle “Show Desktop”
  27. Win + C : Open Charms bar
  28. Win + B : Set focus to Notification Area
  29. Win + Enter : Open Windows Narrator
  30. Win + Alt + Enter : Open Media Center (If Media Center is Installed on PC)
  31. Win + Spacebar : Change the Keyboard Layout / Input Language
  32. Win + PageUp : Move Start Screen to the left side of screen
  33. Win + PageDown : Move Start Screen to the right side of screen
  34. Win + Plus : Magnifier Zoom-In
  35. Win + Minus : Magnifier Zoom-Out
  36. Win + Esc : Close Magnifier
  37. Win + Left Arrow : Dock the current window to left half of the screen
  38. Win + Right Arrow : Dock the current window to right half of the screen
  39. Win + Up Arrow : Maximize the currently active window
  40. Win + Down Arrow : Minimize / Restore the currently active window
  41. Win + Shift + Up Arrow : Maximize the currently active window vertically, while maintaining its width
  42. Win + Shift + Down Arrow : Minimize / Restore the currently active window vertically, while maintaining its width
  43. Win + Shift + Left Arrow : Move the currently active window to the left side of monitor
  44. Win + Shift + Right Arrow : Move the currently active window to the right side of monitor
  45. Win + Home : Toggle (Minimize/Maximize) all non-active windows
  46. Windows + number : Launch the program from taskbar sequence (e.g. To open 1st program window, use Windows + 1)
  47. Windows + Shift + number : Launch a new instance of the currently active program from taskbar sequence (e.g. To open an instance of 1st program window, use Windows + Shift + 1)
  48. Win + Break : Display System Properties dialog box
  49. Win + F1 : Open Windows Help and Support
  50. Win + Forward Slash (/) : Initiate IME (Input Method Editor) reconversion
  51. Win + Tab : Toggle through all Applications
  52. Win + Ctrl + Tab : Toggle through Applications and snap them as they cycle
  53. Win + Shift + Tab : Toggle through Applications in reverse order
  54. Win + Dot (.) : Move the gutter to the right
  55. Win + Shift + Dot (.) : Move the gutter to the left
  56. Win + Comma (,) : Look Temporarily at the desktop

Shortcuts starting with Alt Key :

Alt Key Keyboard Shortcuts on Windows 8 Edition

  1. Alt + W : Create a new document or select a template
  2. Alt + V : Paste
  3. Alt + T : Cut
  4. Alt + S + N : Deselect
  5. Alt + S + I : Invert the selection
  6. Alt + S + A : Select all
  7. Alt + R : Rename selected files
  8. Alt + P + S : Insert label
  9. Alt + P + R : Open properties
  10. Alt + P + E : Display “Open With…” dialog box
  11. Alt + N : Create a new folder
  12. Alt + M : Move the files
  13. Alt + H : Show the history of file versions
  14. Alt + E : Edit selected files
  15. Alt + D : Delete selected files or folder
  16. Alt + C + P : Copy path to the file or folder
  17. Alt + C + O : Copy selected items
  18. Alt + A : Open the “special features”

Hope you have enjoyed the list of shortcuts. Please share your feedback.

Categories
Camera General Awereness Main Technology

CCD / CCTV vs CMOS Camera

Charge Coupled Device (CCD) Camera and Closed Circuit TeleVision (CCTV) Camera are used in producing good quality Digital Video Recordings and Still Photos (for the surveillance purposes).

CCD Camera
CCD Camera
CCTV - CCD Camera
CCTV - CCD Camera

Complementary Metal Oxide Semiconductor (CMOS) Camera are also used for the same purpose but they provide little poor quality as compared to the CCD/CCTV Cameras. In a CMOS Camera Sensor, each pixel has its own charge to voltage conversion, noise correction, amplifier, digitization circuits and chip output bits.

CMOS Camera
CMOS Camera

CCD/CCTV camera are of two types : Digital and Analogue, which are able to send the signals to any PC/Laptop or a Storage Device like Tape Recorder. While CMOS Camera can be plugged to any USB Device, to get all data from the camera.

Here are some major differences between CCD/CCTV and CMOS Cameras :

1. CCTV/CCD Cameras are made up of semiconductors, capacitors and sensors which produce little better videos and photos as compared to the CMOS Cameras.

2. CCD/CCTV Cameras are more sensitive and expensive than the CMOS Cameras.

3. CCD Camera consumes more power than the CMOS Camera.

4. While comparing the cost, CCD Camera costs more than the CMOS Camera.

5. CMOS Sensors are more susceptible to Noise as compared to the CCD Cameras. This noise can contribute to gap in the image quality.

Here is the comparison of Image quality of CCD and CMOS Camera :

CCD / CCTV vs CMOS Comparison in LED TV

Please share your feedback.

Categories
Android Entertainment & Fun Ethical Hacking General Awereness Main Mobile Phones Online Services Tablet PCs Technology

Make Free Voice Calls to US & Canada from Android GrooVe IP by Wi-Fi or 3G/4G (Using Google Voice) | Call US Toll-Free | Alternative to Skype Mobile

I have seen folks looking for the android apps which can let them call free in United Stated and Canada, if not all then at least the toll-free ones.

GrooVe IP uses Google Voice service to call any phone number. [Google Voice provides unlimited calls to United States (US) and Canada, and cheaper international calls].

Though there is an Official Android Version of Google Voice, but it only connects with your Google Account and doesn’t provide a Smartphone VOIP features like Google Voice on Gmail or Skype.

But now with GrooVe IP app you can use your Google Voice account and call all the phone numbers directly from your Android Smartphone. This android software supports receiving and making calls over the Wi-Fi or 3G/4G network, so their is no need to worry about the voice minutes. You can also use this app to make free calls to any US Toll-Free number from your Android Phone or Tablet PC.

Groove IP app is really useful when you are in Wi-Fi Hostspot region or using 3G connection. This app syncs your all your Phone Contacts, and contains a separate dialer in it.

Here is the method for installing and making call by Groove IP :

1. Install Groove IP app on your Phone

Make Free Voice Calls from Android GrooVe IP by Wi-Fi or 3G4G (Using Google Voice)  No Local Minutes Required  Alternative to Skype Mobile
Make Free Voice Calls from Android GrooVe IP by Wi-Fi or 3G4G (Using Google Voice) No Local Minutes Required Alternative to Skype Mobile

2. Now Sign-in by using your Google Account Credentials (which has Google Voice Enabled).

Make Free Voice Calls from Android GrooVe IP by Wi-Fi or 3G4G (Using Google Voice)  No Local Minutes Required  Alternative to Skype Mobile
Make Free Voice Calls from Android GrooVe IP by Wi-Fi or 3G4G (Using Google Voice) No Local Minutes Required Alternative to Skype Mobile

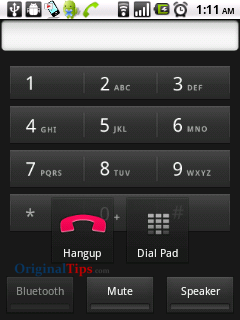
3. Now you can either use your Phonebook or Dial a number to make any call.

Make Free Voice Calls from Android GrooVe IP by Wi-Fi or 3G4G (Using Google Voice)  No Local Minutes Required  Alternative to Skype Mobile
Make Free Voice Calls from Android GrooVe IP by Wi-Fi or 3G4G (Using Google Voice) No Local Minutes Required Alternative to Skype Mobile

Make Free Voice Calls from Android GrooVe IP by Wi-Fi or 3G4G (Using Google Voice)  No Local Minutes Required  Alternative to Skype Mobile
Make Free Voice Calls from Android GrooVe IP by Wi-Fi or 3G4G (Using Google Voice) No Local Minutes Required Alternative to Skype Mobile
Make Free Voice Calls from Android GrooVe IP by Wi-Fi or 3G4G (Using Google Voice)  No Local Minutes Required  Alternative to Skype Mobile
Make Free Voice Calls from Android GrooVe IP by Wi-Fi or 3G4G (Using Google Voice) No Local Minutes Required Alternative to Skype Mobile
Make Free Voice Calls from Android GrooVe IP by Wi-Fi or 3G4G (Using Google Voice)  No Local Minutes Required  Alternative to Skype Mobile
Make Free Voice Calls from Android GrooVe IP by Wi-Fi or 3G4G (Using Google Voice) No Local Minutes Required Alternative to Skype Mobile

Groove IP Android Market Link :

https://market.android.com/details?id=com.gvoip&pli=1&rdid=com.gvoip&rdot=1

Note : Google Voice has no official relationship with the GrooVe IP App.

Categories
General Awereness Main Technology

Monorail vs Metro Rail : Similarities and Difference

Many folks have only heard about the Monorail, but never seen it in actual. On the other side, Metro rail is available in many countries (previously available to only a few countries).

The purpose of both Monorail and Metro Rail is to make the mass transit system more convenient and fast.

Monorail and Metro Rail are different in speed, design and cost. However both are derived from the same concept, which was originated from the problem of congested routes and lots of stoppages in between the tracks. The congested tracks and traffic were giving a big delay while traveling from one place to another. Both the trains are made from light-weight material, so that they can run at a very high-speed, while carrying a thousands of passengers.

Both Metro rail and Monorail run on independent tracks, and their speed is very high as compared to the conventional trains. But when comparing in between, metro rail is more faster than the monorail.

Similarities :

1. Both Monorail and Metro rail runs at a very high speed as compared to the conventional trains
2. Both are made-up of light weight material, which can help in improving their speed
3. Both makes the mass transit system more convenient and fast
4. Both trains run by using electricity as a fuel, and hence no petroleum product gets wasted

Difference :

1. Metro rail and Monorail run on independent tracks
2. Monorail costs less than the Metrorail.
3. Speed of Monorail is low than the Metrorail.
4. Monorails capacity is about 10000 passengers per hour, while Metrorail has a capacity of 40000 passengers.
5. The fare in Monorail is comparatively low than the Metrorail.

Here are the example photos of Monorail :

Monorail vs Metro Rail : Which one is better ?
Mumbai Monorail Trial From Wadala to Bhakti Park

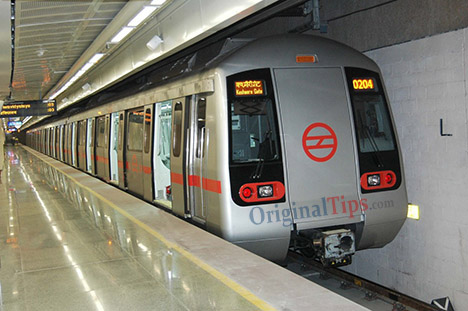
Here are the example photos of Metro Rail :

Monorail vs Metro Rail : Which one is better ?
Categories
Main Web Development

How To Change Default Timeout – Session Lifetime In Joomla

Most of the time you get annoyed when you automatically get logged-out from Joomla administrator panel after a certain time.

It hurts more when you are in middle of writing an article, and Joomla gets logged out without saving it. Now if you have manually saved that article then its good, but if you haven’t then you will have to write the full article again.

Here is the method to change this Default Timeout Session Lifetime :

1. Go to Joomla Administration Panel, and Login with your Credentials

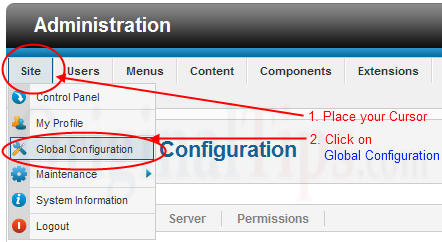
2. Move your mouse cursor to Site Option. Now click on the “Global Configuration” link from the dropdown.

How To Change Default Timeout Session Lifetime In Joomla

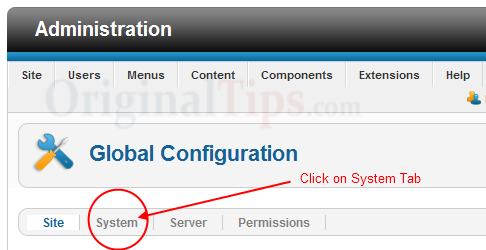
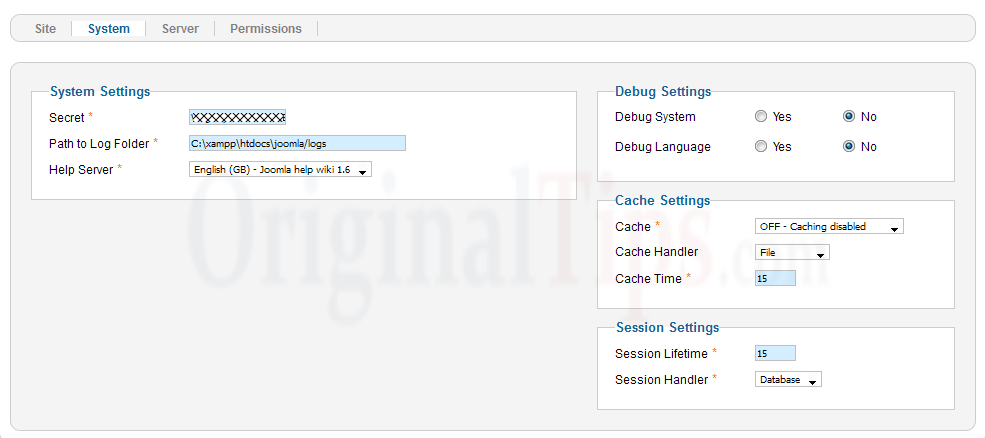
3. Now click on System Tab

How To Change Default Timeout Session Lifetime In Joomla

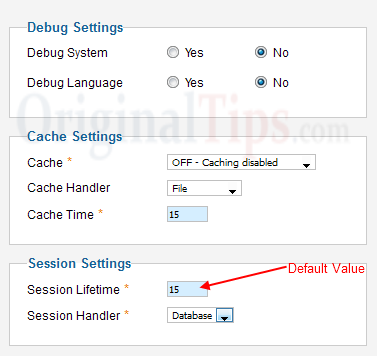
4. Look for the “Session Settings“,

How To Change Default Timeout Session Lifetime In Joomla

5. Change Session Lifetime from default to 7200

How To Change Default Timeout Session Lifetime In Joomla

How To Change Default Timeout Session Lifetime In Joomla

Now your Joomla Administrator Panel will not get logged out automatically within 5 days (5*24*60 = 7200 minutes). You can also change this value to your own.

Note : As per our testing, this trick is applicable to Joomla 1.5, 1.6 and 1.7.

Categories
General Awereness Main

Warranty vs Guarantee : Which one is better ?

Warranty and Guarantee are similar things, In terms of service to a product or service.

Warranty vs Guarantee : Which one is better ?

Guarantee is an assurance document given by the Seller/Manufacturer that ensures the replacement of whole product without repairing it. Guarantee is rarely given by the sellers as it is not feasible to replace all products free of cost. If the sellers provide Guarantee, then it is for a very short time.

Warranty vs Guarantee : Which one is better ?

Warranty is also an assurance document given by the Seller, but it only ensures that the covered parts get repaired under warranty period. A manufacturer may or may not charge for the warranty. Companies will replace the products, only if the fault is unrepairable.

Warranty is of 2 types
1. Full Warranty
2. Limited Warranty

Full Warranty : Full warranty means, all the parts of the product are covered under the warranty, and whenever fault happens with that product, it will get repaired.

Limited Warranty : Limited warranty means, either only a few parts are covered under warranty or warranty is restricted to normal conditions. e.g. In some products, fault occurred due to Shocks are not covered under warranty.

Summary :

1. Guarantee is provided in addition to the Warranty.
2. Warranty may or may not be chargeable, but Guarantee is provided free along with the product
3. Warranty ensures the fault in product gets repaired*, but Guarantee ensures the total product replacement.
4. Warranty is provided for a longer period than the Guarantee
4. Warranty can be renewed, but 5uarantee can’t be renewed after its expiry.

* If a company fails to rectify the fault in the product, then it may replace the whole product.

Categories
Computers Internet Virals Main News Online Services Technology

Google To Launch “Google Drive” – A Cloud Storage Service

Are your running out of Space on your Hard Disk? Do you have to remove old files to download new ones?

If yes, then Google Drive will become a very useful service for you.

Wall Street Journal has just reported that Google is going to launch a cloud-storage service by the name – “Google Drive”. As per a report from Wall Street Journal, Google Drive will give a big competition to the other cloud service providers like Dropbox, Microsoft etc.

As per WSJ, Google Drive will allow you to store Music, Pictures, Documents, Videos on Google Servers, which will be accessible from any device connected to the internet. You can then share those files with anyone. At present Microsoft’s 365 and iPhone’s iCloud are offering the similar cloud storage service.

Google Drive
Google Drive


As per a Google Spokesman, “Google Drive” is just a rumor which is spread from many years.

We have done a research and found that the Google Drive Support Page is working, but the main page is showing 404 Error. The working support page makes our hope stronger about launching the Google Drive.

Google Drive Main Page

Google Drive Working Support Page

Google hasn’t yet officially declared this service and its prices for using the cloud hosting services, but it is considered that these services will be provided free of cost to the Personal and Business Users. However to get a large space there will be a charge.

Let’s see how much time Google takes to launch the Google Drive Service.

Categories
General Awereness Main Mobile Phones News

Top 5 Dual Sim Mobile Phones Under Rs.5000 / $100 : Nokia C2-03, Asha 200, Motorola Quartz EX212, Samsung Chat C3222 DUOS, Karbonn K1616

These days there are number of smartphones available in the market, and people often get confused which one to buy among them.

First of all, keep in mind that buying a Mobile Phone is not a big deal, but buying a Smartphone is just like the status symbol.

You should always choose a mobile phone which can maintain your status-symbol, and also fits into your budget. But remember, you have to be careful while choosing a cheaper mobile phone, otherwise that cheap mobile phone can turn into your mistake.

To ease your selection of good mobile phones under Rs.5000 / $100 budget, we have done a market research and found following 5 phones which are value for money and provides features like a Smartphone.

1. Nokia C2-03 Touch and Type (Price : Rs. 4425 / $88) :

Nokia C2-03 is a Dual Sim S40 Phone. The main feature of this phone is “Easy Swap SIM support”, by which you don’t need to restart your phone to change the SIM Card.

Nokia C2 03 TouchScreen Mobile Phone Price and Specifications

Nokia C2-03 Specifications :

  • Dual SIM TouchScreen Phone with Symbian S40 OS
  • Easy Swap SIM support (Without Restarting)
  • 2MP Primary Camera
  • 2.6 inch screen display
  • 3.5mm Audio Jack
  • Bluetooth version 2.1 with A2DP
  • EDGE
  • Music, and Video Player
  • MicroUSB 2.0 Support
  • Micro SD Memory Card Support upto 32GB
  • 2-days battery backup

2. Motorola Quartz EX212 (Price : Rs. 4599 / $91) :

Motorola Quartz EX212 Price and Specifications

Motorola Quartz EX212 Specifications :

  • Dual SIM Phone with Secondary External Display With Icons
  • 2MP Primary Camera
  • 2.4 inch screen display
  • 3.5mm Audio Jack
  • Bluetooth version 2.1 with A2DP and EDR
  • EDGE
  • Music, and Video Player
  • MicroUSB 2.0 Support
  • Micro SD Memory Card Support upto 16GB

3. Nokia Asha 200 (Price : Rs. 4370 / $87) :

Nokia Asha 200 Price and Specifications

Nokia Asha 200 Specifications :

  • Dual SIM QWERTY Phone
  • 2MP Primary Camera
  • 2.4 inch screen display
  • 3.5mm Audio Jack
  • Bluetooth version 2.1 with A2DP and EDR
  • EDGE
  • Music, and Video Player
  • Stereo FM with RDS and FM recording feature
  • MicroUSB 2.0 Support
  • Micro SD Memory Card Support upto 32GB

4. Samsung Chat C3222 (Price : Rs. 3850 / $77) : (also known as Chat 322 DUOS)

Samsung Chat C3222 aka Ch@t 322 DUOS Price and Specifications

Samsung Chat C3222 aka Ch@t 322 DUOS Specifications :

  • Dual SIM QWERTY Phone
  • 1.3MP Primary Camera
  • 2.2 inch screen display
  • 3.5mm Audio Jack
  • Bluetooth version 2.1 with A2DP and EDR
  • EDGE
  • 3D Music Player, and Video Player
  • Stereo FM with recording feature
  • MicroUSB 2.0 Support
  • 54MB Internal Memory
  • Micro SD Memory Card Support upto 8GB

5. Karbonn K1616 Magic (Price : Rs. 4829 / $96) :

Karbonn K1616 Magic Price and Specifications

Karbonn K1616 Magic Specifications :

  • Dual SIM Phone
  • 3.5 inch Capacitive Touch Screen display
  • 3.2MP Primary Camera
  • 3.5mm Audio Jack
  • Bluetooth version 2.1 with A2DP
  • EDGE
  • Music, and Video Player
  • Stereo FM
  • MicroUSB 2.0 Support
  • Micro SD Memory Card Support upto 8GB
Categories
Computers General Awereness Main Online Services Technology

Managing Google Backup Phone Number and Passwords : Be Tension Free with 2-Step Verification

If you have already enabled the Google 2-Step Verification System, then it is very important to get the alternatives (back-up passwords) to access the Google Account and Services.

There may be the cases like,

  • When you lose your Mobile Phone,
  • If your Phone Network is not available etc.

In such scenarios, there are 2 alternatives :

  • You can add a Backup Phone Number
  • You can download the Printable backup codes

Adding Backup Phone Number :
If your primary phone is not available due to any reason, then you can get verification codes on your Backup Phone Number.

Be Tension Free with Google Backup Passwords - Using 2-Step Verification

To do enable this service,

1. Go to https://accounts.google.com/b/0/SmsAuthConfig.
2. Click on “Add Phone Number” (as shown below)

Be Tension Free with Google Backup Passwords - Using 2-Step Verification

3. Now Select your country, Enter phone number and save it. (You can also ask Google to test this mobile phone number by sending a security code).

Be Tension Free with Google Backup Passwords - Using 2-Step Verification

Printable Backup Passwords (Codes) :
Another way to get access to your Google Accounts without entering Security code is, Printable Security Codes.

Be Tension Free with Google Backup Passwords - Using 2-Step Verification

To get these codes,

1. Go to https://www.google.com/accounts/SmsAuthConfig, and click on “Show backup codes”

Be Tension Free with Google Backup Passwords - Using 2-Step Verification

2. Now Print or Save these passwords in a secure place. As per statement from Google – These codes would be the only method to log-in to your Google Account, if your phones are unavailable.

Be Tension Free with Google Backup Passwords - Using 2-Step Verification

3. You can also generate a new set of backup passwords, if you want older ones to be removed.

Be Tension Free with Google Backup Passwords - Using 2-Step Verification

Hope you have enjoyed the article!
You can also learn how to create application specific passwords for accessing Google account and services.